
The idea for this article began when I faced a challenge in my job, I was given the task of implementing a nested version of self-sizing-cells: a self-sizing UICollectionViewCell inside a self-sizing UITableViewCell.
At first glance, it seemed to be a fairly straightforward task, and I naively thought that everything would “just work” from the beginning, but man, was I wrong.
Since the early days of iPhone development, UITableViews and UICollectionViews have been used by almost every app to display content.
Usually, this content is not static and doesn’t always have the same size, but since the introduction of dynamic type and different screen sizes, it is important to properly display content on every device.
Some years ago, with the release of iOS 8, Apple added the ability to easily implement self-sizing cells in UITableViews and UICollectionViews without having to make these calculations by ourselves.
In this article, we will see how this works with some examples that hopefully will help people who are trying to make self-sizing cells work.
If you want to follow along, you can find the sample code on GitHub .
Self-Sizing Basics
In iOS 11, self-sizing cells are enabled by default, but if we still need to support iOS 10, it is very easy to make it work.
We just need to set estimatedRowHeight to an estimated height value and let UIKit do the calculation for us. UICollectionViewFlowLayout doesn’t need this value since iOS 10.
The system is able to make self-sizing cells work by automatically calculating the size of the cells based on the constraints defined within its contentView.
To help auto layout calculate the correct size, we need to make sure that we have an unbroken chain of constraints for all UI elements from the top anchor to the bottom anchor. We have to make sure that we don’t have an ambiguous layout otherwise the size can’t be calculated.
Beyond the Simplest Case
When we make sure we have a non-ambiguous layout, implementing a self-sizing UITableView or UICollectionView is fairly easy. Things get a bit more tricky when we dive into something more advanced, such as nesting one into the other.
To explain what I found out about this, we will take a look at a couple of different situations to understand how this works.
Before we begin, some notes on the sample code.
- We are writing all the UI code programmatically, no Storyboards or xib files were used.
- We use AutoLayout.
Square View
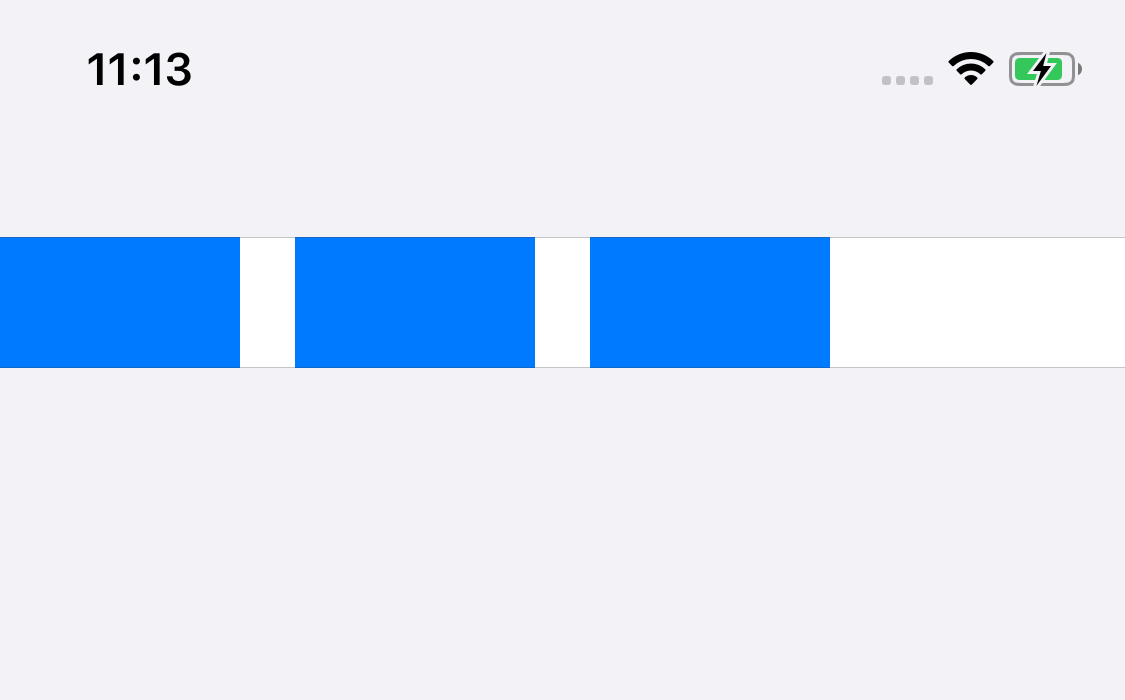
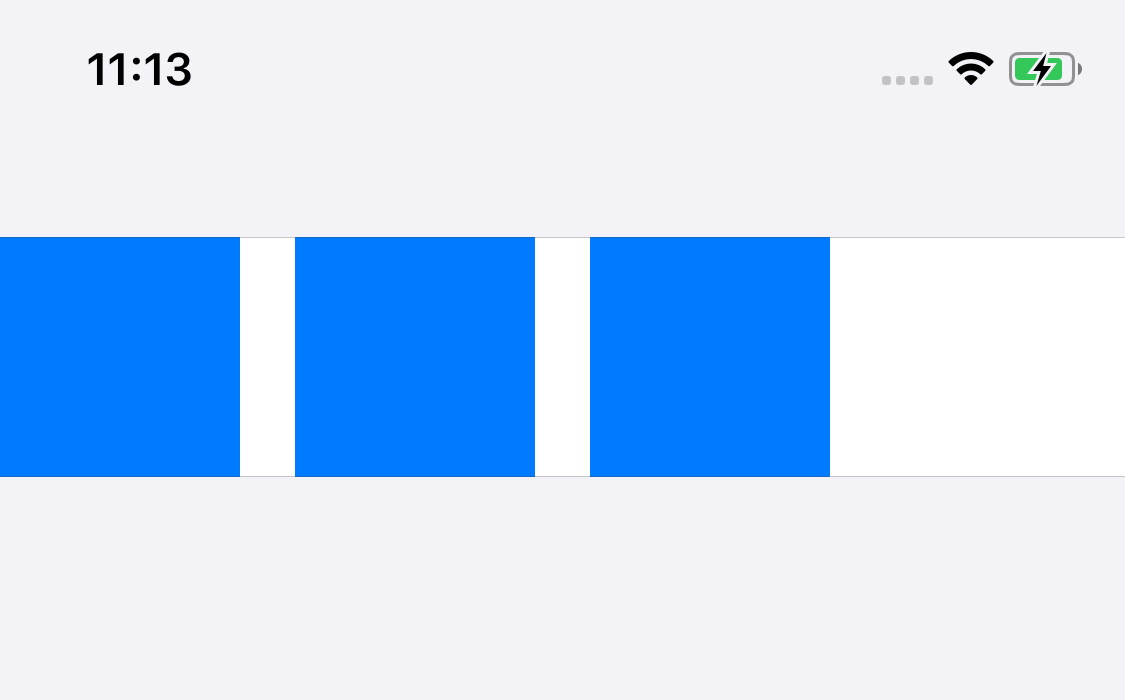
To make things easier to understand, we will use a fixed size (80x80) square view as the only object inside the UICollectionViewCell.
To calculate the correct size of the cells, auto layout needs to know the size of each individual element. In this nested example, auto layout needs to know the UICollectionViewCell size to calculate UICollectionView’s (contentView) size.
To avoid complexities, we defined a width and height of 80 pts to aid auto layout with this calculation.
UICollectionView sits inside UITableViewCell, so auto layout needs its size to calculate the UITableViewCell (contentView) size.
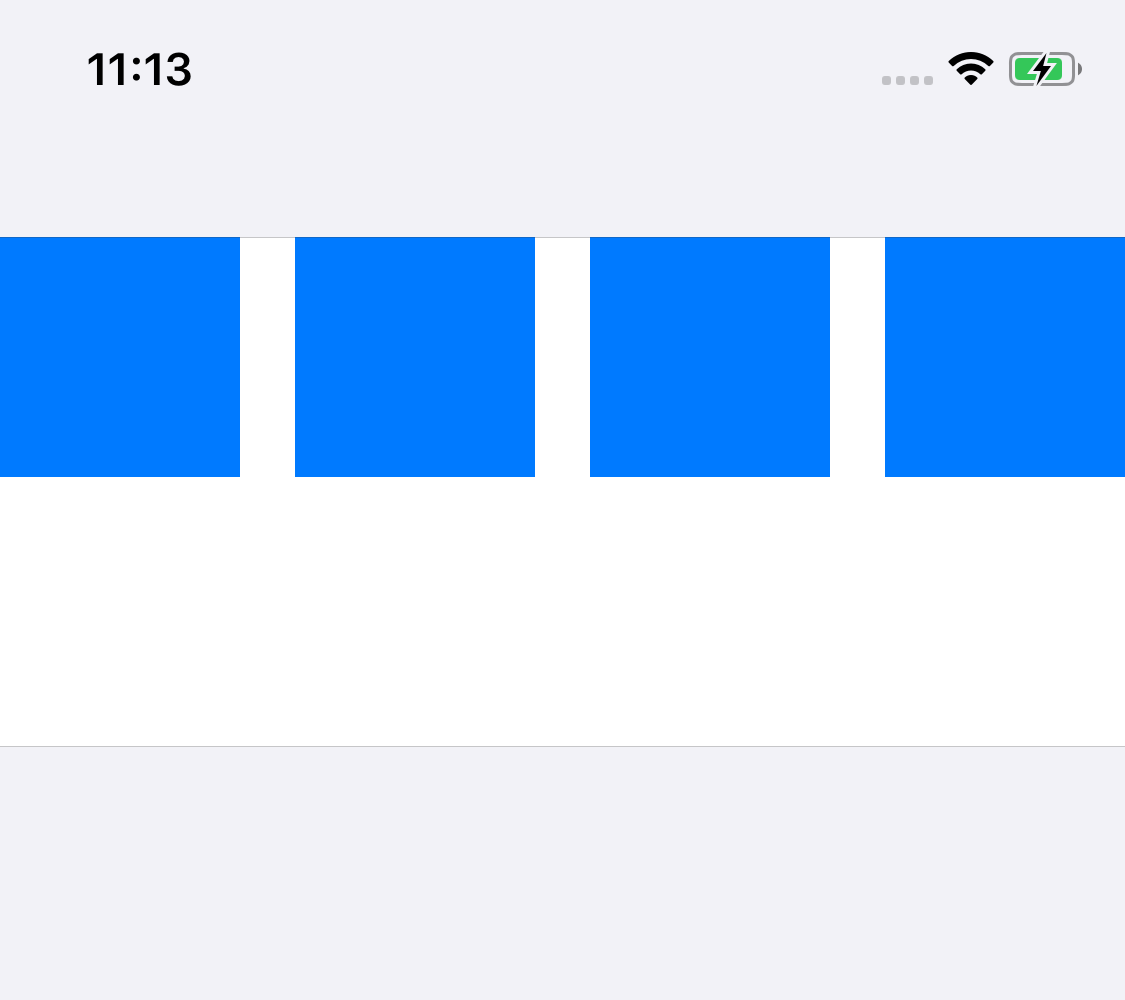
If this would be implemented as a standalone UICollectionView, defining the size of the elements inside the cell would be enough, but in this nested example, we end up with something that looks like this:
Also, we see this warning logged:
Warning once only: Detected a case where constraints ambiguously suggest a height of zero for a table view cell’s content view. We’re considering the collapse unintentional and using standard height instead.
When UITableView’s cell size is being defined, it is using a height of zero, so the system automatically assigns the default cell height of 44 pts.
This happens because the size calculation of the UITableViewCell is happening before the UICollectionView’s contentSize has been defined, so it returns zero.
To calculate the height of a self-sizing cell, UITableView calls systemLayoutSizeFitting(targetSize:horizontalFittingPriority:verticalFittingPriority:) on each cell. This method calculates the height based on the layout defined within the cell.
A good way to debug what is going on is to override this method and see what the call to super is returning. When we do that, we can see that the size being returned is (375 x 44), and since the height of the square view is 80 pts, the content is clipped.
Solutions
I was looking online for a fix for this issue and there are many suggestions about returning UICollectionView’s contentView from the systemLayoutSizeFitting call.
While this solution works for most cases, as shown above, there are some situations where it won’t work, resulting in a weirdly long UICollectionView.
What I’ve found is that this calculation fails because the UICollectionView’s contentView sometimes does not (yet) resize to the correct width of its super view (UITableView) and uses a default UIKit value of 320 pts.
If we run the sample project and set the number of squares to 1 to 3, the calculation is considering a 320pts-wide box and since that number of squares still fits within that box, after the layout pass occurs, the UITableView has the correct height to fit those squares.
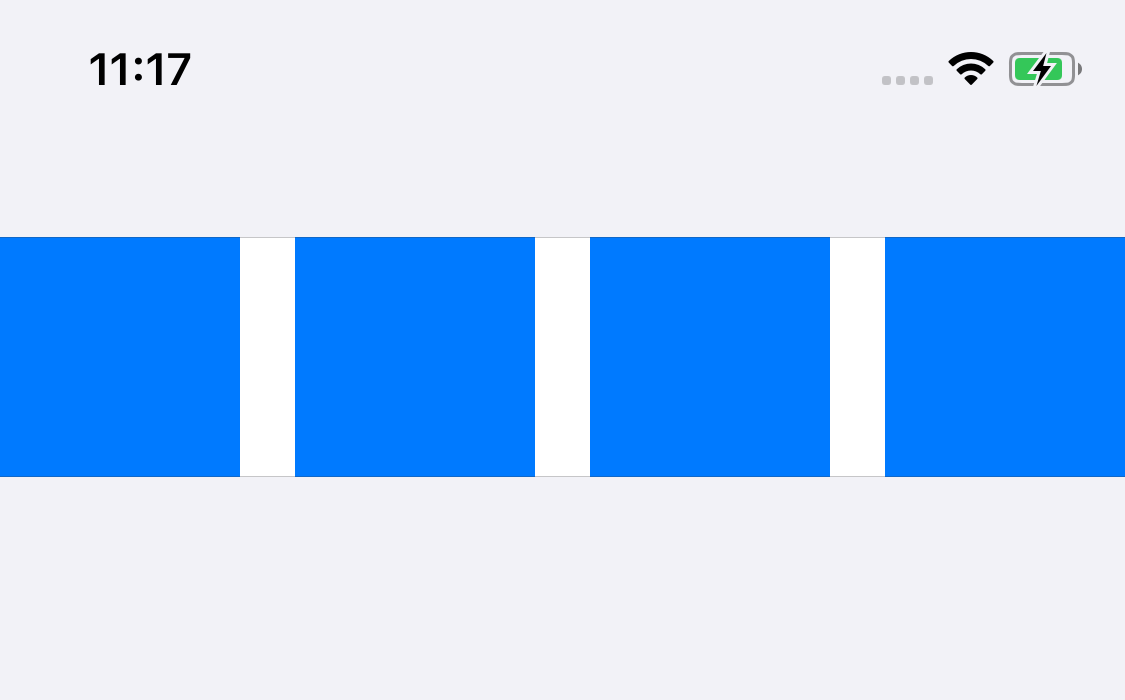
Unfortunately, on the example with four squares, the contentSize of the UICollectionView is also calculated for a 320pts-wide box.
This means that the four squares need to be fitted in a second row and when the layout pass occurs, the four squares will be placed inside one row (matching the UITableView width) but the UITableViewCell was already calculated with the incorrect height.
Solution for the Solution
After playing around with the demo project, I found that we need to force an extra layout pass, so that UITableView can calculate the correct cell height, this is also done inside the systemLayoutSizeFitting method:
What happens here is that we set the UITableView’s contentView frame to the cell’s bounds and then we trigger the new layout pass. When we do this, on the next pass, auto layout will be able to calculate its size using a box with the correct width.
I’ve tried this solution using different layouts, especially the always tricky multi-line UILabel and it seems to consistently fix the issue.
I hope that there is a cleaner way of doing this, so if you have any suggestions, please send them my way.
Summary
In this article, we’ve seen how to fix a common issue when implementing nested self-sizing cells.
Depending on your specific case, try to debug what is being returned in the systemLayoutSizeFitting method and take a look at the order of the sizing and layout passes.
There is good information online about this topic, I recommend Renault Lienhart’s NSSpain talk .
Find the sample code used in this article on GitHub .
As I mentioned at the beginning, I hope this quick explanation of how self-sizing cells work will be useful for people that face this same challenge.